Asp.NET Controls in List Type
There are controls in Asp.NET that we can use to make users choose. Although the appearance of these controls is different, their usage logic is the same.
Although controls such as ListBox, DropDownList, CheckBoxList, RadioButtonList, BulletedList are separate classes, they have almost the same properties and methods. For example, it is possible to add elements to all of them by using Add method.
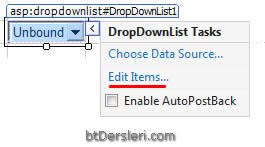
When creating these controls, each of the elements to be listed after the main tag is written is specified with a separate ListItem tag. We can write the elements in the body part ourselves, or we can add them by clicking on the place shown in the picture.
For example, when we create a DropDownList named provinces and enter a few city names, the codes will be as follows.
<asp:DropDownList ID="DropDownList1" runat="server">
<asp:ListItem Value="34">İstanbul</asp:ListItem>
<asp:ListItem Value="06">Ankara</asp:ListItem>
<asp:ListItem Value="35">İzmir</asp:ListItem>
<asp:ListItem Value="16">Bursa</asp:ListItem>
</asp:DropDownList>
While some of the list elements allow single selection, some of them can be multi-selected and this is the most important difference.
Properties of List Controls
While these controls have many features, a few of the most important are described below.
SelectedValue Property
Returns the value of the selected element. When Istanbul element is selected in the list above, this value will be 34.
Example:
label1.Text = DropDownList1.SelectedValue;
SelectedIndex Property
Returns the index number of the selected element. Each element in the list has an index number according to its order, and the number of the first element is 0. In the list above, the index number of the Istanbul element is 0, and the index number of the Ankara element is 1.
If no selection is made, the index number is -1. In this way, it can be understood whether a selection has been made from the list or not.
Example:
if ( DropDownList1.SelectedIndex != -1 )
{
// Actions if selection made
}
SelectedItem.Text
This feature is not available for list controls that allow multiple selection. It is used to obtain the text property of the currently selected element in controls such as DropDownList and RadioButtonList.
Example:
label1.Text = RadioButtonList1.SelectedItem.Text
The same result can be achieved using the ToString method as follows:
Example:
label1.Text = RadioButtonList1.SelectedItem.ToString( );
Items.Count
Returns the number of elements in the list.
Example:
int a = DropDownList1.Items.Count;
Items[ i ].Selected
Used in list controls where multiple selection is allowed. Indicates whether the element with index number i is selected or not.
For example, we can understand whether the element with index number 3 of the list named ListBox1 is selected or not.
if ( ListBox1.Items[ 3 ].Selected == true ) .......
Items[ i ].Text
Returns the text property of the element i index.
For example, we can obtain the text property of the 2nd index element of the CheckBoxList1 as follows.
label1.Text = CheckBoxList1.Items[ 2 ].Text ;
asp.net list controls, list elements and properties, selectedindexchanged tutorials, using listbox dropdownlist checkboxlist radiobuttonlist bulletedlist usage examples properties
EXERCISES
|
Checkboxlist find and print all selected elements
|
|
When we use a CheckBoxList, the user will be able to make multiple selections. We can use a simple loop code to check which elements in the list are selected:
for (int i = 0; i < CheckBoxList1.Items.Count; i++)
{
if (CheckBoxList1.Items[i].Selected) Label2.Text += CheckBoxList1.Items[i].ToString() + " ";
}
Read 2646 times.