Product Detail Page Tutorial
Dynamic content on the sites that are listed on a page of records , we see that clicked often record details of displaying on another page. Many examples can be given, such as shopping sites, lecture-subject sites and news sites.
This page explains step by step how to prepare a simple product detail page. You can also watch the process steps in our video.
First of all, a database with product information is required. Let there be a table named products in this database, and there should be various features of the products in this table.
We will prepare two pages. We will list the product names on the first page and link them automatically . We will also add product code information with QueryString to this link.
On the second page, the record with the product code that comes with the QueryString will be taken and displayed in the FormView.
Preparing the 1st Page (The Page to List the Products):
Let's create a page named productListele.aspx. Let's add a SqlDataSource to this page that will fetch the productName fields of all the records in the products table (you can use the optional where).
Then let's add a ListView and bind it to this DataSource.
Let's arrange it as follows by adding the ItemTemplate to this ListView:
<ul id="urunListesi">
<asp:ListView ID="ListView1" runat="server" DataSourceID="SqlDataSource1">
<ItemTemplate>
<li>
<a href='<%# "urunDetay.aspx?urun="+Eval("urunId") %>'>
<%# Eval("urunAdi") %>
</a>
</li>
</ItemTemplate>
</asp:ListView>
</ul>
Here the ul tag opens before ListView and then closes. Li tag is opened in ItemTemplate as it will be used once for each record .
This is the logic needs to be understood here: everything from ItemTemplate tags , will be replicated to all records .
Using Eval command, the product name is displayed between the a tags.
In the href parameter , the QueryString product parameter is added to the name of the page to be linked , and the productId information is assigned to this parameter with the Eval command.
When we run the page and view the source, you will see that the li and a tags are created for each record between the ul tags.
You can format the ul tag as you want with Css and get the look you want.
You can also use different methods instead of the ul tag. Let's write another example on this subject:
<asp:ListView ID="ListView1" runat="server" DataSourceID="SqlDataSource1">
<ItemTemplate>
<p>
<a href='<%# "urunDetay.aspx?urun="+Eval("urunId") %>'>
<%# Eval("urunAdi") %>
</a>
</p>
</ItemTemplate>
</asp:ListView>
In this example, the name of each product will appear between the p and a tags.
Our first page is now ready. When we click on the product name, it sends us productDetail . We have links that will direct you to the aspx page and take the productId information in the QueryString when you go.
Preparing the 2nd Page (Product Details Page):
Let's add a SqlDataSource to this page.
When connecting to the Products table, let's click the Where command and set it as in the picture:
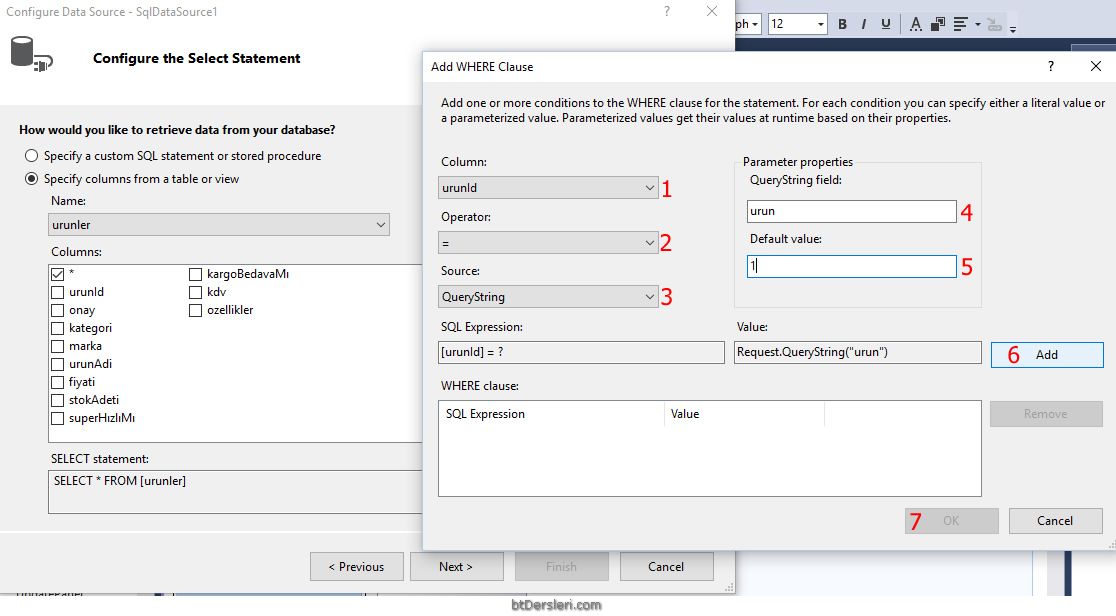
In the field number 4, we must write the name of the parameter that contains the productId information in the QueryString.
Field 5 is optional. If the requested information does not come with the QueryString, we can write the value we want to be used by default here.
When we click the Add button, our condition will be added to the query, we can continue by clicking the OK button.
After the DataSource has been prepared in this way, we need an object to display the incoming information. We can use one of the display objects ListView , FormView , DetailsView etc. We used ListView on the first page. Let's use FormView this time.
Difference between FormView and ListView :
ItemTemplate , InsertItemTemplate, EditItemTemplate views are created automatically when we create a FormView . In addition, asp.net controls (label, textbox, etc.) for all fields are added between these tags. We can delete and edit the ones we don't want.
When we create a ListView, no Template is created automatically. It's up to us to create all the looks.
Also, FormView can only show one record at a time . On the other hand, ListView can show more than one record as a list.
Let's arrange the inside of the FormView similar to the following:
<asp:FormView ID="FormView1" runat="server" DataKeyNames="urunId" DataSourceID="SqlDataSource1">
<ItemTemplate>
<h1><%# Eval("marka") %></h1>
<h2><%# Eval("urunAdi") %></h2>
<p class="fiyat"><%# Eval("fiyati") %> TL</p>
<p><%# "Kalan Adet: "+Eval("stokAdeti") %></p>
<asp:Image ID="Image1" ImageUrl="kargoBeles.jpg" Visible='<%# Eval("kargoBedavaMı") %>' runat="server" />
<asp:Image ID="Image2" ImageUrl="superHizli.jpg" Visible='<%# Eval("superHızlıMı") %>' runat="server" />
<p>Kdv:<%# Eval("kdv") %></p>
<div class="ozellik">
<%# Eval("ozellikler") %>
</div>
</ItemTemplate>
</asp:FormView>
Creating an asp.net product detail page, listing the details of the clicked product on another page, listing the records and linking automatically, asp.net product details page tutorial, listing the details of the clicked record
EXERCISES
There are no examples related to this subject.
Read 3017 times.